In a nutshell: To dry sage, you can choose between hang-drying or oven-drying methods. In both options, it’s essential to remove excess moisture before drying to ensure the leaves become dry, brittle, and easy to crumble for storing in an airtight container.
With its strong herbal taste, a little sage can add a lot of flavor to any dish.
Whether you grow your own herbs or purchase them, you can easily end up with more sage than you can use. Luckily, you can dry sage to prolong its shelf life.
This means that a good herb harvest can add flavor to your cooking for many months, without having to worry about anything going to waste.
Follow the guide below to find out everything you need to know when drying sage leaves.
Can You Dry Sage Leaves?
Yes, you can dry herbs quite easily, and that includes your sage plants. There are several methods to dry fresh sage including in the oven, hanging, or using a food dehydrator.
Oven-Drying
The oven method is a quick way to dry out sage leaves. This is the best way to dry sage if you live in a very humid climate. Humidity and moisture in the air can lead to mold forming before the herb has a chance to fully dry.
Drying sage in the oven can dull the flavor slightly, damaging the oils. As a simple tip, always use the lowest setting on your oven when drying herbs.
Air-Drying
Although it does not require too much extra effort, air-drying the leaves is the most time-consuming drying method. It generally takes around 10 days. Drying times will, however, vary depending on the climate.
The flavor preservation with hang drying is better than oven-dried sage.
When drying sage, it is important to make sure that moisture is completely eliminated before packing the herbs. Mold will develop if moisture is present, even inside your packaging. The leaves should be crispy and crumble when rubbed between your fingers.
Leaves that are still somewhat pliable and do not crumble are not yet sufficiently dried. Once dried and packaged, store the sage in a cool, dark, and dry place away from direct sunlight.
How To Dry Sage
Preparation: Cleaning
Remove sage leaves from the stem. Discard any damaged, moldy, or discolored leaves. Lightly rinse the leaves in cold water. This will remove dirt, chemicals, and small insects. Don’t let the leaves spend too much time in the water.
Place the sage leaves on clean paper towels or a kitchen towel and pat dry. You can also use a salad spinner. To successfully dry herbs, it is essential that you remove excess moisture. Do not start the drying process if the leaves are still moist from cleaning.
Decide whether you want to air-dry or oven-dry the leaves and follow the instructions below accordingly.
Option 1: Hang Drying
Step 1: Tie Bundles
Gather 8 or fewer sage leaves and tie their stems together with a twist tie, rubber band, or string to form small bundles. Don’t tie more than 8 leaves in a bundle as the leaves won’t dry evenly and may start to mold before they have a chance to fully dry out.
Step 2: Hang
Choose a light place with good air circulation and hang the sage bundles to dry. Avoid drying herbs in a humid area such as spaces near a stove, dishwasher, or bathroom.
To protect the herbs from dust, cover each bundle with a perforated paper bag or muslin cloth. Punch holes in the bag and leave the bottom open to allow for sufficient air-flow.
Do not use plastic as this will prevent airflow and cause mold.
After 7 to 10 days, the leaves should be dry, brittle, and break easily when you handle them.
Step 3: Store
Take the dried herb bundles down and carefully remove the brown bag. Working over a bowl, crumble the dried leaves into small pieces with your hands. They should break with little effort. Alternatively, give them a quick whizz in a food processor.
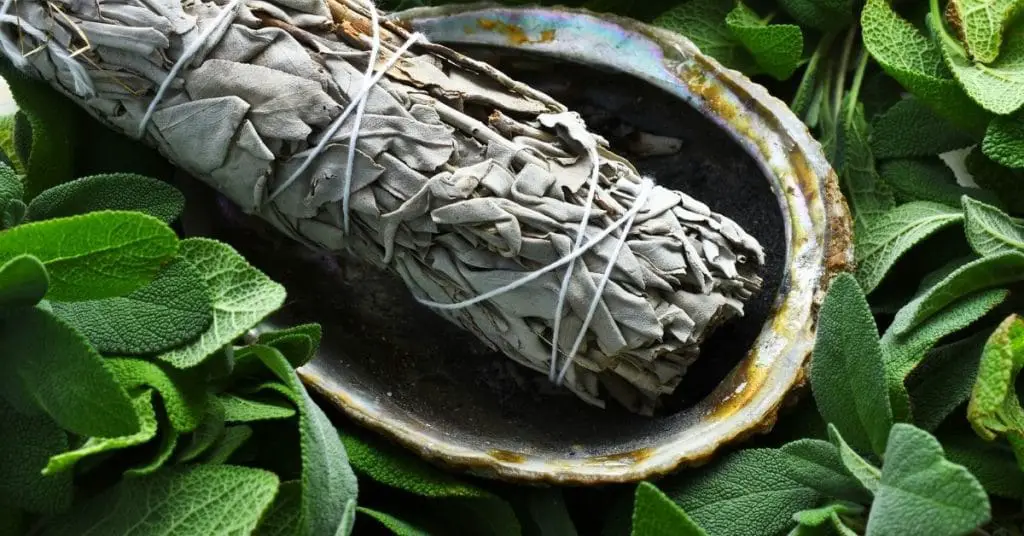
Small, crushed pieces are best for cooking, however, you can store the leaves whole if you are making a sage bundle.
Store the dried, crushed herbs in a glass jar or airtight container and label it with the date and contents.
Option 2: Oven-Dry
Step 1: Preheat Oven
Preheat the oven to its lowest temperature setting around 180 degrees Fahrenheit (82°C).
Step 2: Prepare Leaves
Place the cleaned sage leaves on a baking sheet lined with parchment paper. Arrange the leaves in a single layer so that they do not overlap or touch each other.
Step 3: Bake
Place the cookie sheet inside the preheated oven and prop the door open slightly to allow for some airflow. Turn the leaves after 30 minutes to allow even drying on both sides. Return the tray to the oven keeping the door propped open.
After a further 30 minutes, remove the baking tray from the oven. The leaves should be dry and crumble when pinched between your fingers.
If the leaves are not yet completely free of moisture, place them back in the warm oven and check on them every 5 minutes.
Step 4: Store
Let the leaves cool for a few minutes and then crush the dried leaves over a bowl or plate. Store the sage in a resealable plastic bag, spice bottle, or air tight container. Label with the date and contents.
Types of Sage
Having a herb garden where you grow your own sage and other herbs is a great way to get the best flavor into your cooking and also to save money.
You can grow sage quite easily and yield a plentiful supply from a single plant. The best time to harvest sage (or any other fresh herbs) is mid to late morning after the dew has dried.
The sage plant has oblong leaves with small flowers. They blossom in a variety of colors including lavender, blue, red, and white. The leaves are green with a gray-silver tinge created by a lining of many short, microscopic hairs.
The most common type of sage used in cooking is referred to as garden sage. The herb has a pronounced herbal flavor with earthy and peppery notes.
The aromatic herb is used mostly in savory dishes, pairing well with pork, duck, chicken, fatty meats, and vegetables. It is also used in pasta dishes, tomato sauces, sage butter, stews, omelets, and even to make herbal tea.
FAQs
Fresh sage will last 10 to 14 days in the refrigerator. Properly dried sage will last 1 to 2 years if kept in cool, dry conditions.
If you are using dried herbs, only use one-third of the fresh amount required in the recipe. If your recipe calls for 1 Tablespoon of fresh sage, you can use one teaspoon of dried sage instead.
Yes, although the microwave method can be used to dry sage, it can also damage the leaves and flavor very quickly.
It is super easy. To dry your sage in the microwave, lay the leaves on a paper towel in a single layer so that they do not overlap. Place another paper towel on top to cover the leaves. Microwave for 90 seconds. Thereafter, microwave in 15-second intervals until the leaves are dry and crunchy.
The drying time for sage before burning depends on the method used. For hang drying, it takes approximately 7 to 10 days, while oven-drying at the lowest temperature (around 180°F or 82°C) takes about 1 to 2 hours. Ensure the leaves are dry, brittle, and break easily before burning.
Conclusion
Sage can be used as a fresh herb or in its dried form to add glorious flavor to your favorite recipes. You can use whole leaves, crushed, ground, or rubbed sage in anything from baked goods and stuffing to sauces and meat dishes.
The method you choose to dry sage will depend on the climate, time, and equipment available. Always make sure the leaves are completely dry before packing. With your stash of dried herbs handy year-round, there are no more excuses for bland meals.
See more on how to dry thyme, parsley, basil, oregano, and cilantro.
See more: What can you use in place of sage?

*image by shutterbug68/depositphotos
